How to Get a Henna Tattoo: A Comprehensive Guide
Henna tattoos, also known as mehndi, have been a cherished art form for centuries, deeply rooted in cultural traditions across South Asia, the Middle East, and Africa. More than just skin decoration, henna embodies celebration, blessings, and beauty. If you’re considering adorning yourself with a temporary henna design, understanding the process, safety precautions, and aftercare is crucial. This comprehensive guide will walk you through everything you need to know about how to get a henna tattoo, ensuring a safe and stunning experience.
Understanding Henna: Natural vs. Black Henna
Before diving into the application process, it’s vital to differentiate between natural henna and so-called “black henna.” Natural henna, derived from the *Lawsonia inermis* plant, produces a reddish-brown stain. This is the traditional and safe option. Black henna, on the other hand, often contains a chemical dye called paraphenylenediamine (PPD) at high concentrations. PPD can cause severe allergic reactions, including blistering, scarring, and permanent skin sensitivity. Always insist on natural henna and inquire about the ingredients used.
Identifying Natural Henna
- Color: Natural henna paste is typically green or brownish-green.
- Scent: It has an earthy, plant-like aroma.
- Stain: The resulting stain will be reddish-brown, deepening over 24-48 hours.
Dangers of Black Henna
- PPD: High levels of PPD cause allergic reactions.
- Skin Damage: Can lead to burns, blisters, and permanent scarring.
- Long-Term Sensitivity: May cause lifelong sensitivity to PPD and related chemicals.
Choosing Your Design and Artist
Selecting the right design and a skilled artist is paramount for a satisfying henna experience. Consider the cultural significance of different motifs and choose a design that resonates with you. Research artists in your area, review their portfolios, and ensure they use only natural henna. A reputable artist will be knowledgeable about henna safety and able to answer your questions thoroughly.
Design Considerations
- Cultural Significance: Understand the meaning behind different designs.
- Placement: Consider the placement on your body and how it will complement your features.
- Complexity: Choose a design that matches your desired level of intricacy.
Finding a Reputable Artist
- Portfolio Review: Examine their previous work to assess their skill and style.
- Ingredient Inquiry: Confirm they use only natural henna and ask about the ingredients.
- Hygiene Practices: Ensure they maintain a clean and sanitary workspace.
- Reviews and Testimonials: Read reviews from previous clients to gauge their experience.
Preparing Your Skin
Proper skin preparation is essential for optimal henna stain development. Clean the area thoroughly with soap and water, and avoid applying lotions, oils, or moisturizers. Exfoliating the skin gently can also help remove dead skin cells, allowing the henna to penetrate more effectively. Shaving or waxing the area beforehand is recommended to ensure a smooth surface for application.
Steps for Skin Preparation
- Cleanse: Wash the area with soap and water to remove dirt and oils.
- Exfoliate: Gently exfoliate to remove dead skin cells.
- Avoid Lotions: Refrain from applying lotions, oils, or moisturizers.
- Shave or Wax: Remove hair from the area for a smooth surface.
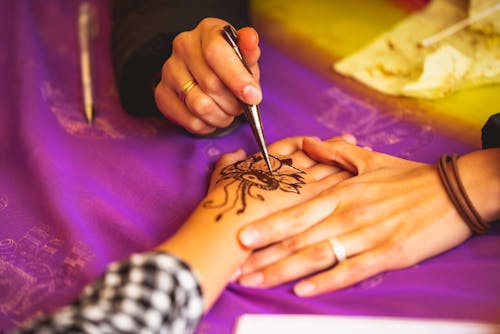
The Henna Application Process
The henna application process typically involves the artist applying the henna paste to your skin using a cone or applicator. The paste is left on for several hours, allowing the dye to penetrate the skin. The longer the paste remains in contact with the skin, the darker and more lasting the stain will be. Once the paste is dry, it will begin to crack and flake off.
Application Techniques
- Cone Application: The most common method, using a cone filled with henna paste.
- Applicator Bottles: Used for finer lines and intricate details.
- Stencils: Can be used for creating precise designs.
Paste Drying Time
The drying time varies depending on the humidity and temperature. It’s generally recommended to leave the paste on for at least 2-6 hours, or even overnight, for the best results. To keep the paste moist and prevent it from cracking prematurely, you can apply a mixture of lemon juice and sugar. This also helps the henna stain penetrate deeper into the skin. Learning how to get a henna tattoo involves patience.
Aftercare: Maximizing the Stain
Proper aftercare is crucial for achieving a rich, long-lasting henna stain. Avoid washing the area with soap and water for at least 12-24 hours after removing the paste. Instead, gently scrape off any remaining paste. Apply a natural oil, such as coconut oil or olive oil, to moisturize the skin and protect the stain. Avoid exposure to chlorine, harsh chemicals, and excessive water, as these can fade the stain prematurely. [See also: Henna Tattoo Aftercare Tips]. With the right aftercare, your henna tattoo can last for one to three weeks.
Aftercare Tips
- Avoid Water: Minimize exposure to water for the first 12-24 hours.
- Apply Oil: Moisturize the skin with natural oil.
- Avoid Soap: Refrain from using soap on the area.
- Avoid Chlorine: Protect the stain from chlorine and harsh chemicals.
Troubleshooting and Potential Issues
While henna tattoos are generally safe, some potential issues can arise. Allergic reactions to natural henna are rare, but they can occur. If you experience itching, redness, or swelling, discontinue use immediately and consult a healthcare professional. As mentioned earlier, be wary of black henna and its associated risks. If you notice any signs of burning, blistering, or scarring, seek medical attention promptly. Understanding how to get a henna tattoo also involves understanding potential problems.
Addressing Allergic Reactions
- Discontinue Use: Stop using the product immediately.
- Seek Medical Advice: Consult a healthcare professional for treatment.
- Identify the Cause: Determine if the reaction is due to natural henna or an additive.
Dealing with Black Henna Reactions
- Immediate Medical Attention: Seek medical care promptly.
- Topical Steroids: May be prescribed to reduce inflammation.
- Antibiotics: May be necessary to prevent infection.
Henna Tattoo Variations and Trends
Henna art continues to evolve, with new variations and trends emerging. White henna, often used for bridal designs, is not true henna but rather a body paint that sits on the surface of the skin. Jagua henna, derived from a fruit, produces a blue-black stain. Glitter henna combines henna with cosmetic glitter for a sparkling effect. Experiment with different styles and techniques to find what you love, but always prioritize safety and choose natural henna whenever possible. The art of learning how to get a henna tattoo is constantly evolving.
Exploring Different Styles
- White Henna: Body paint for a temporary white design.
- Jagua Henna: Creates a blue-black stain.
- Glitter Henna: Combines henna with glitter.
Conclusion: Embracing the Art of Henna
Getting a henna tattoo can be a beautiful and meaningful experience. By understanding the difference between natural and black henna, choosing a reputable artist, preparing your skin properly, and following aftercare instructions, you can ensure a safe and stunning result. Embrace the art of henna and adorn yourself with a temporary masterpiece that reflects your personal style and cultural appreciation. Remember, learning how to get a henna tattoo safely is the first step to enjoying this ancient art form. From choosing the right design to understanding the application process and aftercare, this guide provides all the information you need to enjoy a beautiful and safe henna experience. The knowledge of how to get a henna tattoo is now at your fingertips. Enjoy your new henna tattoo!
